 Inspection Checklist
The Inspection Checklist system provides a professional method of documenting the condition of a vehicle after service has been completed. It helps:
•Improve communication with the client
•Document vehicle condition
•Identify maintenance concerns
•Reinforce the thoroughness of your shop
•Build customer confidence and repeat business
The checklist system is completely customizable. Once configured, it may be attached to any workorder where an inspection is desired.
This section explains how to create and configure the checklist itself. For instructions on using the checklist during work processing, refer to the Work Processing section of this manual.
Creating, Editing, and Deleting Entries
The controls at the top of the screen operate similarly to other MLS 2026 list editors.
These include:
•Add
•Save
•Delete
To create a new checklist item:
1.Press the Add button
2.Enter the desired information
3.Press Save
To modify an existing entry:
1.Highlight the item in the list
2.Make the desired changes
3.Press Save
To remove an item:
1.Highlight the record
2.Press Delete
Prebuilt Checklists
MasterLink Software can provide a preconfigured inspection checklist designed for automotive service operations.
You may:
•Use it exactly as provided
•Add your own items
•Remove unwanted entries
•Customize wording and categories
This gives most shops an excellent starting point while still allowing complete flexibility.
Understanding the Checklist Layout
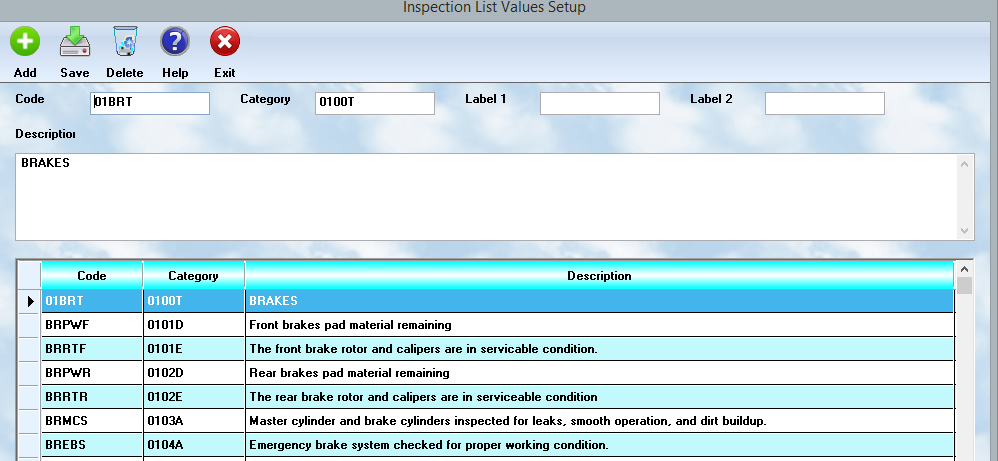
The lower half of the screen displays the complete checklist in the order it will appear when printed.
When you highlight an item:
•The detailed information for that record appears in the upper portion of the screen
•You may then review or edit the settings
The order of records in the list determines the order of appearance on the printed inspection form.
Record (Line Item) Details
Code
The Code field is an internal reference value for the inspection item.
The code may contain:
•Letters
•Numbers
•Any naming convention you prefer
The field supports up to 10 characters.
Many shops use coding systems similar to:
•Existing glossary entries
•Service categories
•Vehicle systems
Maintaining a consistent naming structure makes future editing easier.
Category
The Category field controls:
•Grouping
•Sorting
•Printing order
•Formatting
This is the most important organizational field in the checklist system.
The format uses a five-character structure.
Positions 1 & 2 — Group ID
These positions define the major inspection category.
Examples:
•01 = Brakes
•02 = Tires
•03 = Cooling System
Use values from:
•01 through 99
Always use a leading zero for single digit groups.
Example:
•Use 01 instead of 1
Positions 3 & 4 — Subgroup
These positions define subcategories within the group.
Example:
•0101 = Front Brakes
•0102 = Rear Brakes
This keeps related inspection items organized together.
Position 5 — Sequence / Special Codes
This final position controls ordering and formatting.
Normal entries may use:
•Letters
•Numbers
Examples:
•0102A
•0102B
•0102C
Using letters makes it easier to insert additional entries later without reorganizing the entire checklist.
Special Position 5 Codes
T = Title
Using a T in position 5 creates a section title.
Example:
•0100T
Title entries print with special formatting and boxed headings to improve readability on the inspection report.
S = Space
Using S creates a blank line (spacing) in the printed checklist.
This improves readability between sections.
Label 1 and Label 2
Labels are optional fields used when the technician must enter values during the inspection.
Examples include:
•Tire tread depth
•Brake measurements
•Fluid readings
•Battery voltage
Example structure:
Category |
Description |
Labels |
0201A |
Tire Condition |
None |
0201B |
Front Tire Depth |
Left Front / Right Front |
0201C |
Rear Tire Depth |
Left Rear / Right Rear |
On the actual inspection form, technicians enter values beside the labels.
Most checklist items will not require labels.
Description
The Description field contains the actual text printed on the inspection checklist.
Best practices:
•Keep wording short
•Use customer-friendly language
•Avoid excessive technical terminology
•Make findings easy for the customer to understand
The goal is to communicate clearly and professionally.
Sample Checklist File
To help simplify setup, MLS 2026 includes a sample inspection checklist database.
The sample file is:
EPRINL.DBF
You will typically find it in:
MLS2026s\MLS\
To use the sample checklist:
1.Copy the file into the root MLS2026s folder
2.Open:
Tools → Index
3.Select:
Workorders
4.Press:
Index
The sample checklist will then become available for use and customization.
You may:
•Add items
•Delete entries
•Modify wording
•Reorganize categories
This provides an excellent starting point for building your own customized inspection process.
Final Recommendations
A well-designed inspection checklist:
•Improves professionalism
•Documents vehicle condition
•Helps reduce disputes
•Creates additional service opportunities
•Demonstrates thoroughness to the client
The more consistent your inspection process becomes, the more valuable the checklist system will be to your business and customer relationships.