Payments to vendors may be made through The Auto Shop Writer with full tracking in the Payments section. This capability extends beyond pure Accounts Payable because it allows for the payment of bills as they arrive, and the ability to cut checks for items as they are received.
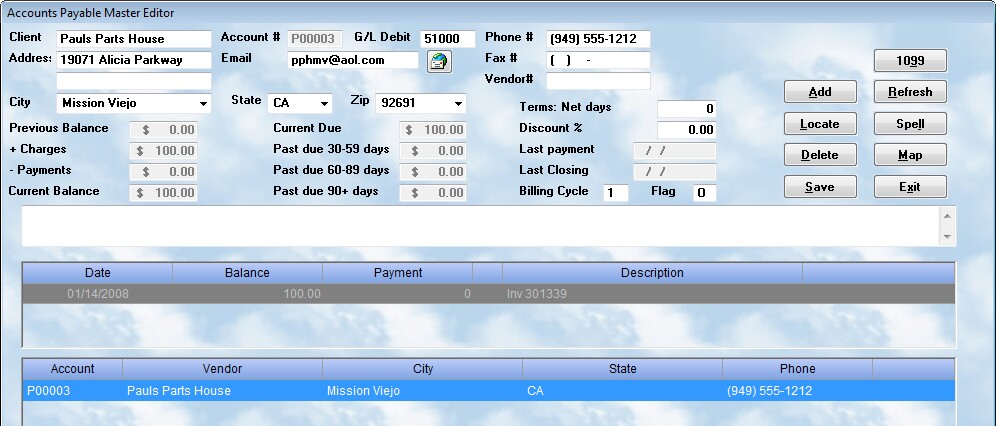
Before charges and payments can be posted, accounts must be setup. This is done on the Payments - Edit screen shown below.
Every vendor who has a payables account is assigned a number. This is done automatically when you elect to create a new account. This number will be the ID used by the system whenever vendor processing is accomplished, or when the account is referenced by another program. The information for all vendors is found in the menu item Payment - Edit.

New Accounts
To set up a new account, select the![]() option, and enter the the basic vendor data (name, address, and phone numbers). The system will automatically provide an account number.
option, and enter the the basic vendor data (name, address, and phone numbers). The system will automatically provide an account number.
Locating Existing Accounts
You can simply browse the vendor screen until you find the proper company / individual, or you can use the ![]() option to more quickly locate the vendor.
option to more quickly locate the vendor.
Vendor Data
The system tracks the name, address, and phone number of the vendor so that the company can be located quickly. In addition, it asks for the Debit G/L account number. This is the expense account to which purchases from this vendor would most often be charged. This will vary for each of the vendors, because some may supply goods, while others provide services. The number can be overridden at the time of posting. Enter the number which will be used most frequently into this field.
The vendor # is that account identifier assigned by the other company for you.
Balances and Flags
When the payables screen is first displayed, in addition to the name, address, and phone numbers of the client, the system will display terms, and totals at the time of the last statement and closing. Each time a payables' closing is performed, the system sets the previous ending balance as the new beginning balance. The charges and payments during the billing period are also accumulated, providing a new ending balance.
When the closing is performed, all of the unpaid invoices are analyzed, and the aging of accounts is posted. These totals, as displayed on the opening edit screen, reflect the total activity at the last processing. The date when that processing took place is posted, as is the date of the last payment.
Payable accounts should be processed in batches. It is often possible to divide the work by natural means, ie. those accounts that are processed after the 1st week of the month might be 1, those after the second week are 2, etc. Some may be Monthly, or Weekly, or Special. These codes are the Payment Cycle, and the accountant will handle up to 36 cycles (one for each letter and number). These billing cycles are used for statements and closing a period.
Even if all bills are processed on the same day, multiple accounts are recommended. Logistically, it is easier to handle processing smaller groups.
The system also has a Flag field. If the account is active, the flag should be Open. If it is Closed, it should be noted. Finally, accounts that are marked Hold will prevent any sales or services for the customer. This can be a very effective tool in debt collection.
The Credit Limit is active in the system and will interface with the customer record when developing a workorder to prevent excess charges from being posted to the account without proper authorization.
The Net days field enables the account manager to specify when bills must be paid. Whenever invoices exceed that amount of time, they are considered delinquent, and are tracked accordingly when viewing late payments. An invoice, using the hot accounts system, will be flagged if it is even one day past the number specified in this field.
Edit data
To edit any of the information displayed on the primary payables data screen, simply locate the proper vendor record. All fields will be displayed in edit mode, and changes can be made. Once changes are made, select the {button Save, } key to retain the data permanently in the file.. If you fail to save the data, your changes will not take effect.
Current Activity
Although the system displays the current balances, it is often vital to view the individual records of the current activity. Your business may have owed vendor Sams Supply $1,400 three weeks ago, but that may not be your current balance. View the current activity with balances, and recent payments, view the middle browse window where the transaction information is displayed. Each line details the date, charge/payment amount, the current balance, and reference information. The list may be far longer than the size of the window. The arrow keys will move the highlight bar, and scroll the listings, either up or down.
1099 Data

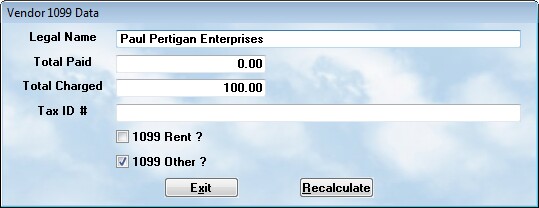
This popup screen will provide access to the information used in preparing a 1099 form for the vendor. If you intend to issue a 1099, click the Rent or Other box to indicate the type, and it will be included in the data output. You should also enter a Legal name for the vendor corporation. The system will automatically track the payments and charges throughout the year, although the 1099 is issued only for the actual payments made. You can Recalculate this total at any time by pressing the right hand button.
Edit notes
Notes may be very vital for an account. The system maintains a note pad for each account. When using the Hot Accounts option, notes will be made to reflect your commitments for payment, or special considerations granted by the vendor.
Map
The Map button will interact with Google via the internet and show you a map to the location of the vendor.
Refresh
The Refresh button will recalculate the totals for this account and update it on the screen. This is particularly useful if you have a loss of data in your file.
Please remember:
•Processing vendor accounts is handled with payment periods.
•Payments to Vendors may be done manually by writing checks to an individual account ( Posting ), or automatically by using the Write Checks option. Although you have an option to Write Checks in the bank account, it is not recommended that this option be used for paying vendors.
•Charges for Vendors may be posted to the account automatically with some workorder functions, and when using the Stock Input option for parts. Other charges may be posted manually with the Posting option.
•Totals for Accounts Payable vendors are updated with each transaction. You may double check the totals displayed on this screen by selecting the Refresh button. The system will automatically recalculate and redisplay the totals.
•All transactions, balances, and totals are available for preview and printed summary in the Reports menu option.