When you first open a database file in the File Editor, the amount of information displayed can seem overwhelming.
Many files contain:
•dozens of fields
•thousands of records
•and far more information than you may actually need for a specific task
Scrolling endlessly across the screen looking for important information quickly becomes frustrating.
To solve this problem, the MLS 2026 File Editor provides:
•Record Filtering ( rows )
•Column Selection ( fields )
These tools may be used independently, or combined together, to create a highly focused and efficient data view.
The following examples are shown with screenshots in the printed and electronic versions of this manual.
Selecting Records ( Rows ) to View
![]() When you select the Filter button from the main File Editor window, the system displays a dialog box that allows you to filter the displayed records.
When you select the Filter button from the main File Editor window, the system displays a dialog box that allows you to filter the displayed records.
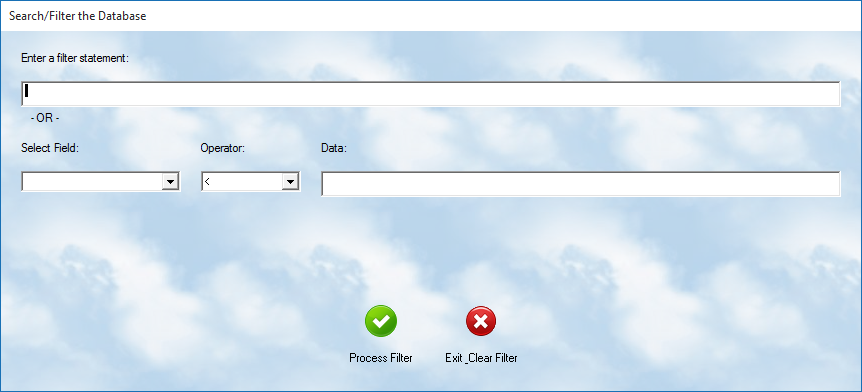
Only records matching your criteria will remain visible.
All others are temporarily hidden from view.
⚠️ Important
Filtering does NOT modify data.
It only changes what is displayed on the screen.
This makes filtering completely safe for experimentation.
Filter Methods
The editor provides two methods for creating filters.
Direct Filter Statement
Enter a Filter Statement
This option allows entry of:
advanced xBASE filter expressions
These are programming-style commands used to perform very specific searches.
Most users will not need this capability unless they:
•understand xBASE syntax
•work regularly with databases
•or receive instructions from MasterLink Software support
MasterLink technicians often use these statements to:
•isolate damaged records
•identify inconsistencies
•locate duplicate information
•or troubleshoot database issues quickly
If you regularly use custom filter commands:
it is suggested that you save them in the MLS Notebook system
using a section such as:
Commands
for future reference.
Guided Filter Builder
The easiest method is the built-in:
Select
filter builder.
This allows you to create filters without needing programming knowledge.
Field
The:
Field
is the specific database field you wish to examine.
Examples:
•client name
•workorder number
•service date
•balance
•zipcode
•vehicle make
Each field has a defined name as described in the:
System File Structures
section of this manual.
Operator
The:
Operator
defines how the comparison is made.
Available operators include:
Operator |
Meaning |
= |
Equal to |
< |
Less than |
<= |
Less than or equal to |
<> |
Does not equal |
>= |
Greater than or equal to |
> |
Greater than |
Data
The:
Data
value is the actual information you wish to compare against.
Examples:
•SMITH
•5000
•01/01/2026
•CA
•92701
⚠️ Important
Database filtering works with exact values.
“Close” values are not automatically assumed by the system.
Applying the Filter
After entering your criteria:
•press the Process Filter button
The editor will immediately display only matching records.
Clearing the Filter
To restore the full database display:
•reopen the Filter dialog
•then press:
Exit — Clear Filter
All records will once again be visible.
Selecting Fields ( Columns ) to View

The File Editor also allows you to control:
which columns are displayed
This can dramatically simplify your view.
Below the toolbar you will see the:
Column Header Bar
This area contains several powerful features.
Showing or Hiding Columns
To customize displayed columns:
•right click on the header bar
A popup list of all available fields will appear.
Each field contains a checkbox.
•Checked = displayed
•Unchecked = hidden
This allows you to remove unnecessary fields and focus only on the information important to your task.
Sorting by Columns
You may also:
•left click on any indexed column header
When selected:
•the database is reordered by that field
•and an arrow indicator appears
Ascending
^
Descending
v
Once reordered:
simply begin typing
and the editor will immediately position to matching records.
This makes locating information extremely fast.
Combining Filters and Column Selection
The true power of the File Editor comes from combining:
•Record Filters
•and Column Selection
Together these tools allow you to:
•isolate only desired records
•display only important fields
•reduce screen clutter
•and create highly focused data views
For example:
you might:
•filter only overdue invoices
•display only client name, balance, and phone number
•then export the results directly to Excel
Independent Operation
Record filters and column selections operate independently.
Changing one does NOT automatically reset the other.
Examples:
•changing the filter keeps your selected columns
•changing visible columns does not remove your filter
This allows you to build highly customized working views very quickly.
Exporting Custom Views
The view you create is also used when exporting to:
•printed reports
•or Excel spreadsheets
This makes the File Editor a surprisingly powerful:
custom reporting tool
without requiring separate report-writing software.
Important Reminder
⚠️ Filters and column selections affect only the display.
They:
•do NOT change database contents
•do NOT remove records
•and do NOT alter stored data
Feel free to experiment and learn how these tools work.