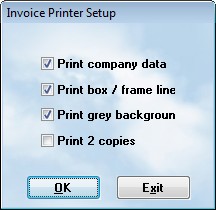
You can enhance your invoice printout in several ways.
Datamanager - Setup - Invoice

In this setup box, you can do the following:
Print Company Data
If you check it, the system will print the data automatically. If you are using pre-printed forms with this data already included, uncheck the box.
Print box/frame line
Check this to have boxes printed around the header and a frame around the workorder
Print grey background
Check this to have the grey shading on the background of selected framed boxes. It provides a more professional appearance.
Adding a Watermark
Perhaps you would like a graphical image printed on each page of the invoices and estimates. You can do this by adding a file to the ASW8s folder on the server named wtrmk.bmp . This file contains the graphic you want to use which is usually a shop logo. It is important to make sure it is a subdued image. It should be light enough so the printing will stand out against it. Watermarks are usually printed as grey and have perhaps 20% intensity, or 80% transparency. A graphics specialist can provide you with the proper file.
Creating A Graphic Heading
You can use a bitmap graphic heading for your company. To do this, you will create bitmap files and place them in the ASW9s folder on the server. Please use the following information. You may wish to have a graphic artist provide the files:
Page Banner
Usually the page banner contains a logo, and the company name. If you place the file with a banner into the ASW9s folder, then it will automatically print the graphic IF you uncheck the Company box in the Invoice setup screen. To add the banner, do the following:
•Name the file mlbanner.bmp
•The graphic must be 576 x 72 pixels
•Place the file in the ASW9s folder
•Uncheck the Print the Company data box in the Invoice Setup screen
Address Box
You can put the whole graphic into the address box. However, some people would rather just enter the address and phone number(s) there. Create a bitmap that has the information, as you want it displayed.
•Name the file mlcologo.bmp
•The graphic must be 774 x 194 pixels
•Place the file in the ASW9s folder on the server.
•Uncheck Print the Company data box in the Invoice Setup screen.